
ROOT-SERVER TUTORIAL
Setting up WireGuard® on Ubuntu Servers


Introduction
In this tutorial, we'll have a look at how to set up WireGuard® on a freshly installed Ubuntu server. In this case, we use the smallest available netcup VPS, as it has more than enough power for our small WireGuard® server. But first let's clarify what WireGuard® is (quote from the WireGuard® website):
WireGuard® is an extremely simple yet fast and modern VPN that utilizes state-of-the-art cryptography.
In this tutorial, we focus on a simple setup with one server and one client peer.
Requirements
- Server (root or VPS)
- Ubuntu as operating system (Debian would also work).
Step 1 - Install WireGuard®
First we need to install WireGuard® on our new server. For Ubuntu this is quite easy:
sudo apt install wireguard
Step 2 - Generate keys
WireGuard® works with private and public keys. For every client, we need one private and one public key. WireGuard® treats the server itself as a client too, so we also need private/public keys for the server.
To generate these keys, we can use the following commands:
wg genkey | tee server-private.key | wg pubkey > server-public.key
wg genkey | tee client-private.key | wg pubkey > client-public.key
We now have a private/public key for the server and a private/public key for one client.
Step 3 - Configuration of the WireGuard® server
To configure the WireGuard® server, we need to edit the following file:
sudo nano /etc/wireguard/wg0.conf
The content of this file should look like this:
[Interface]
Address = 10.0.0.1/24
PrivateKey = <server-private.key>
ListenPort = 51820
SaveConfig = true
PostUp = iptables -A FORWARD -i wg0 -j ACCEPT; iptables -t nat -A POSTROUTING -o eth0 -j MASQUERADE; ip6tables -A FORWARD -i wg0 -j ACCEPT; ip6tables -t nat -A POSTROUTING -o eth0 -j MASQUERADE
PostDown = iptables -D FORWARD -i wg0 -j ACCEPT; iptables -t nat -D POSTROUTING -o eth0 -j MASQUERADE; ip6tables -D FORWARD -i wg0 -j ACCEPT; ip6tables -t nat -D POSTROUTING -o eth0 -j MASQUERADE

[Peer]
PublicKey = <client-public.key>
AllowedIPs = 10.0.0.2/32
Addresswill set the internal IP address range of the WireGuard® network.PrivateKeyshould be the previously generatedserver-private.key.ListenPortdefines the port of the WireGuard® server.SaveConfigdefines whether the current config should be saved when the service is stopped.PostUpensures that the firewall doesn't block the connection when the WireGuard® server is started.PostDownremoves the firewall rules once the WireGuard® service is stopped.- For every client in the network one
[Peer]element should be created within this file (therefore there is only one element in our example). PublicKeyshould contain the previously generatedclient-public.key.AllowedIPsdefines all IPs that this peer is allowed to have when connected to the network.
Step 3.1 - Define IP forwarding
We also need to define IP V4 forwarding to make WireGuard® work on our Ubuntu netcup server:
sudo nano /etc/sysctl.conf
- #net.ipv4.ip_forward=1
+ net.ipv4.ip_forward=1
Step 4 - Configure client
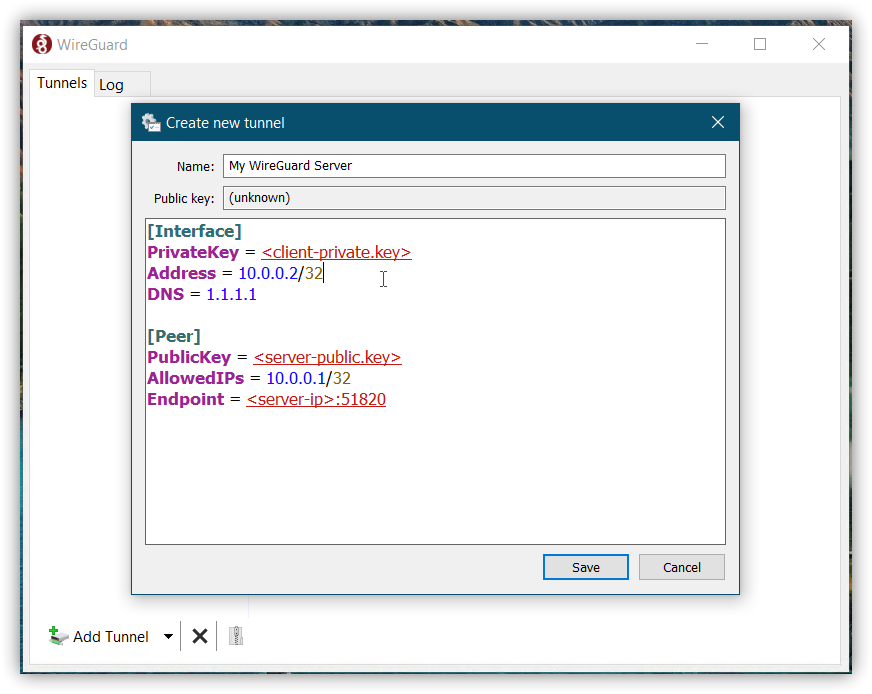
Besides the server, we also need to configure our client. As in WireGuard® client and server are just peers in the network and therefore treated equally, the config file for the client looks very similar to that of the server, but some specific server options are missing:
[Interface]
PrivateKey = <client-private.key>
Address = 10.0.0.2/32
DNS = 1.1.1.1

[Peer]
PublicKey = <server-public.key>
AllowedIPs = 10.0.0.1/32
Endpoint = <server-ip>:51820
PrivateKeyshould be the previously generatedclient-private.key.Addressis the address of this peer within the network. Should be unique.DNSsets a custom DNS server (in this example the Cloudflare server).Peershould contain the information of the WireGuard® server.PublicKeyshould be the previously generatedserver-public.key.AllowedIPsshould be the internal IP of the server.Endpointis the IP and the port to where the client should connect.
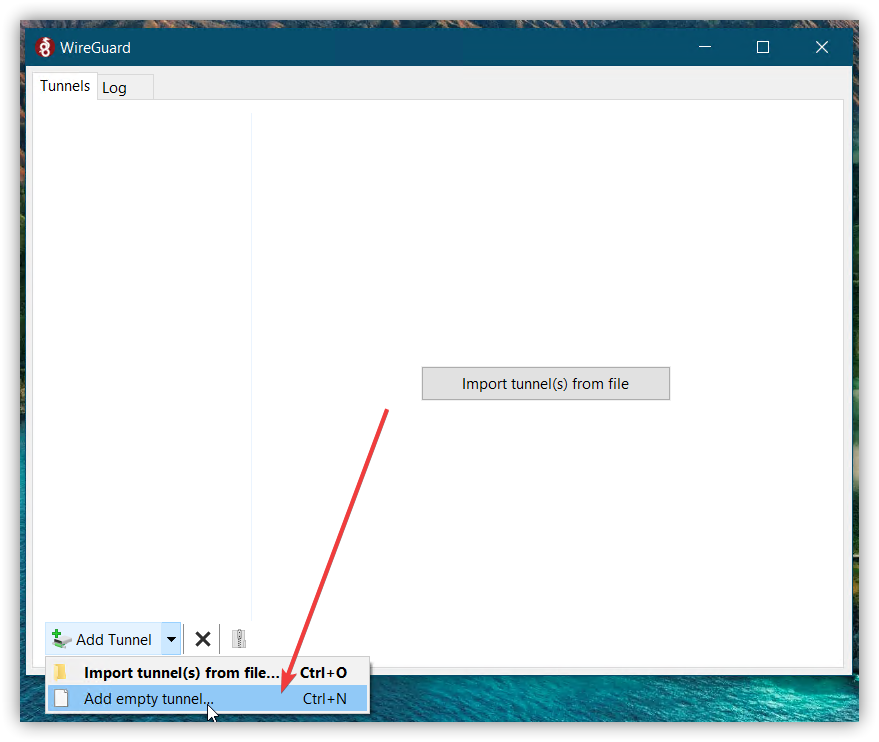
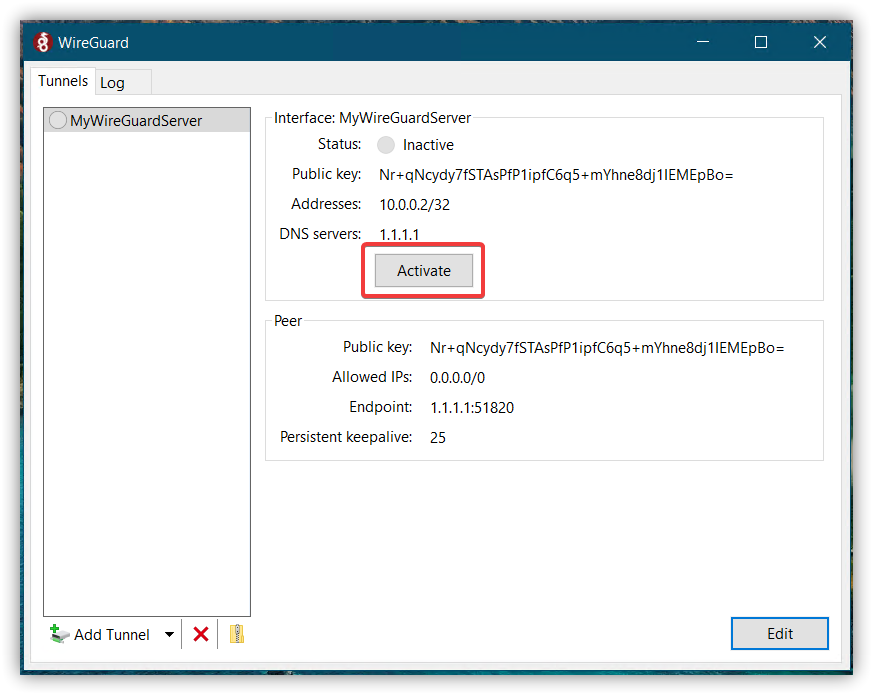
Step 4.1 - Via GUI

Step 4.2 - Via config file
If you want to connect to your server via the command line, you need to add the above configuration to the following file:
sudo nano /etc/wireguard/wg0.conf
Now you can connect to the server by using the following command:
sudo wg-quick up wg0
Step 5 - Delete the previously generated keys
Since we've already inserted our generated keys into the config files, we can safely delete them:
rm server-public.key server-private.key client-public.key client-private.key
Step 6 - Autostart WireGuard®
Normally we want to start WireGuard® automatically when our server is started. For this purpose, run the following commands:
sudo wg-quick up wg0
sudo systemctl enable wg-quick@wg0
Conclusion
Compared to other services like OpenVPN, WireGuard® is much smaller, cleaner and therefore also faster. No wonder even Linux founder Linus Torvalds is very supportive of this project. It's a great way to secure a connection when you're connected to a public WIFI, for example.
For more information, please visit the WireGuard® website.
License
Permission is hereby granted, free of charge, to any person obtaining a copy of this software and associated documentation files (the "Software"), to deal in the Software without restriction, including without limitation the rights to use, copy, modify, merge, publish, distribute, sublicence, and/or sell copies of the Software, and to permit persons to whom the Software is furnished to do so, subject to the following conditions:
The above copyright notice and this permission notice shall be included in all copies or substantial portions of the Software.
THE SOFTWARE IS PROVIDED "AS IS", WITHOUT WARRANTY OF ANY KIND, EXPRESS OR IMPLIED, INCLUDING BUT NOT LIMITED TO THE WARRANTIES OF MERCHANTABILITY, FITNESS FOR A PARTICULAR PURPOSE AND NONINFRINGEMENT. IN NO EVENT SHALL THE AUTHORS OR COPYRIGHT HOLDERS BE LIABLE FOR ANY CLAIM, DAMAGES OR OTHER LIABILITY, WHETHER IN AN ACTION OF CONTRACT, TORT OR OTHERWISE, ARISING FROM, OUT OF OR IN CONNECTION WITH THE SOFTWARE OR THE USE OR OTHER DEALINGS IN THE SOFTWARE.
Contributor's Certificate of Origin
By making a contribution to this project, I certify that:
-
The contribution was created in whole or in part by me and I have the right to submit it under the license indicated in the file; or
-
The contribution is based upon previous work that, to the best of my knowledge, is covered under an appropriate license and I have the right under that license to submit that work with modifications, whether created in whole or in part by me, under the same license (unless I am permitted to submit under a different license), as indicated in the file; or
-
The contribution was provided directly to me by some other person who certified (a), (b) or (c) and I have not modified it.
-
I understand and agree that this project and the contribution are public and that a record of the contribution (including all personal information I submit with it, including my sign-off) is maintained indefinitely and may be redistributed consistent with this project or the license(s) involved.