
ROOT-SERVER TUTORIAL
Web Server (Apache) + PHP + MariaDB (MySQL) + Certbot + phpMyAdmin Tutorial on Debian


Introduction
In this tutorial you will learn how to install an Apache web server and MariaDB (MySQL) on Debian servers. In addition, we'll explain how to install a number of helpful programs and web services on the servers, such as:
- PHP
- Certbot
- phpMyAdmin
I am doing this on a Debian 11 server (RS 2000) but this guide should also work on other Debian versions.
This tutorial contains content sourced from these documents: https://github.com/SanCraftDev/Debian-Setup/blob/main/README.md and https://github.com/louislam/uptime-kuma.
Requirements
You need a Debian server with an internet connection. The server should be accessible from the internet via a static IP on port 80 and 443.
You also need root permissions on your server.
Step 1 - Apache2
Step 1.1 - Installing snapd and Certbot
First, we need to install snapd and Certbot to obtain SSL certificates:
apt update && apt upgrade -y && apt autoremove -y
apt install curl sudo wget apache2-utils nano git snapd cron zip unzip tar screen openssl software-properties-common dirmngr apt-transport-https -y
snap install core; snap refresh core
sudo snap install --classic certbot
sudo ln -s /snap/bin/certbot /usr/bin/certbot
{ crontab -l 2>/dev/null; echo "$(( $RANDOM % 60 )) $(( $RANDOM % 3 + 3 )) * * * sudo certbot renew --dry-run" ; } | crontab -
Step 1.2 - Installing Apache2
Now we are going to install Apache2 and configure it:
apt install apache2 libapache2-mod-php brotli -y
a2enmod rewrite headers env dir mime proxy proxy_http proxy_wstunnel headers ssl http2 expires filter brotli
a2disconf other-vhosts-access-log
{ crontab -l 2>/dev/null; echo "* * * * * chown -R www-data:www-data /var/www" ; } | crontab -
cd /etc/apache2
nano apache2.conf
Press CTRL + W to search for <Directory /var/www/>.
Search for the line AllowOverride None and replace it with AllowOverride All.
- AllowOverride None
+ AllowOverride All
Now add the following at the end of the file:
Protocols h2 h2c http/1.1
SetOutputFilter BROTLI_COMPRESS
SetEnvIfNoCase Request_URI \.(?:gif|jpe?g|png)$ no-brotli

<IfModule mod_headers.c>
    ## Serve brotli compressed CSS files if they exist
    ### and the client accepts brotli.
    RewriteCond "%{HTTP:Accept-encoding}" "br"
    RewriteCond "%{REQUEST_FILENAME}\.br" "-s"
    RewriteRule "^(.*)\.css"              "$1\.css\.br" [QSA]

    ## Serve brotli compressed JS files if they exist
    # and the client accepts brotli.
    RewriteCond "%{HTTP:Accept-encoding}" "br"
    RewriteCond "%{REQUEST_FILENAME}\.br" "-s"
    RewriteRule "^(.*)\.js"               "$1\.js\.br" [QSA]

    Header set Vary *

    ## Serve correct content types, and prevent double compression.
    RewriteRule "\.css\.br$" "-" [T=text/css,E=no-brotli:1]
    RewriteRule "\.js\.br$"  "-" [T=text/javascript,E=no-brotli:1]


    <FilesMatch "(\.js\.br|\.css\.br)$">
      ## Serve correct encoding type.
      Header append Content-Encoding br

      ## Force proxies to cache brotli &
      ## non-brotli css/js files separately.
      Header append Vary Accept-Encoding
    </FilesMatch>
</IfModule>
Save your changes by pressing CTRL + X, then y.
Now we generate a self-signed certificate for the undefined Apache2 hosts:
openssl req -nodes -new -x509 -subj '/CN=*' -sha256 -keyout /etc/ssl/privkey.pem -out /etc/ssl/fullchain.pem -days 365000
Next, we redirect every HTTP request over HTTPS and delete the Apache2 default configs, as we don't need them:
rm sites-enabled/000-default.conf
rm sites-enabled/000-default-le-ssl.conf
rm sites-enabled/default-ssl.conf
rm -r /var/www/html                       # run this only if you know that you do not have anything saved inside this folder
nano sites-enabled/0-http.conf
Paste these lines into the file:
<VirtualHost *:80>
    RewriteEngine on
    RewriteCond %{HTTPS} off
    RewriteRule ^/?(.*) https://%{HTTP_HOST}/$1 [R=301,L]

    ErrorLog ${APACHE_LOG_DIR}/http-error.log
</VirtualHost>

<VirtualHost *:443>
    ErrorLog ${APACHE_LOG_DIR}http-error.log
    SSLCertificateFile /etc/ssl/fullchain.pem
    SSLCertificateKeyFile /etc/ssl/privkey.pem
</VirtualHost>
Save your changes by first pressing CTRL + X, then y and finally by hitting ENTER.
Step 1.3 - Installing PHP
wget -O /etc/apt/trusted.gpg.d/php.gpg https://packages.sury.org/php/apt.gpg
sh -c 'echo "deb https://packages.sury.org/php/ $(lsb_release -sc) main" > /etc/apt/sources.list.d/php.list'
apt update
apt install zip unzip redis-server libapache2-mod-php8.0 libapache2-mod-fcgid libmagickcore-6.q16-6-extra php-dompdf php-pear php8.0 php8.0-{cli,gd,mysql,pdo,mbstring,tokenizer,bcmath,xml,fpm,curl,zip,common,intl,redis,opcache,readline,xsl,bz2,imagick,bcmath,gmp,sqlite3,apcu} -y
nano /etc/php/8.0/apache2/php.ini
Now we have to configure PHP:
- Add
apc.enable_cli = 1to the first empty line. This is sometimes required by Nextcloud as it enables the use of APCu from the CLI. - Press CTRL + W and ENTER:
memory_limit = 128M.- Replace this line with
memory_limit = 1024Mor use more/less RAM (M = megabytes of RAM).
- Replace this line with
- Press CTRL + W and ENTER:
post_max_size = 8M.- Replace this line with
post_max_size = 10G. This defines the maximum file size for uploading. You can set this value lower if you don't plan to upload 10-gigabyte files (for example, 100M for maximum 100 megabyte files).
- Replace this line with
- Press CTRL + W and ENTER:
upload_max_filesize = 2M.- Replace this line with
upload_max_filesize = 10G. This defines the maximum file size for uploading. You can set this value lower if you don't plan to upload 10-gigabyte files (for example, 100M for a maximum of 100-megabtye files).
- Replace this line with
- Press CTRL + W and ENTER:
;date.timezone =.- Replace this line with
date.timezone = Europe/Berlin(or change it to your time zone).
- Replace this line with
a2enmod proxy_fcgi setenvif
a2enconf php8.0-fpm
cp /etc/php/8.0/apache2/php.ini /etc/php/8.0/cli/php.ini
cp /etc/php/8.0/apache2/php.ini /etc/php/8.0/fpm/php.ini
a2dismod php*
a2dismod mpm_prefork
a2enmod mpm_event
service apache2 restart
service php8.0-fpm restart
curl -sS https://getcomposer.org/installer | sudo php -- --install-dir=/usr/local/bin --filename=composer
{ crontab -l 2>/dev/null; echo "$(( $RANDOM % 60 )) $(( $RANDOM % 3 + 3 )) * * * curl -sS https://getcomposer.org/installer | sudo php -- --install-dir=/usr/local/bin --filename=composer" ; } | crontab -
Step 1.4 - Installing MariaDB
apt-key adv --fetch-keys 'https://mariadb.org/mariadb_release_signing_key.asc'
add-apt-repository 'deb [arch=amd64,i386,arm64,ppc64el] https://mirror.netcologne.de/mariadb/repo/10.5/debian bullseye main'
apt install mariadb-server mariadb-client -y
Step 1.4.1 - Securing MariaDB
mysql_secure_installation
Press Enter
Press y
Press y
Set a secure password
Press y
Press y
Press y
Press y
Step 1.4.2 - Creating a user with root permissions on MariaDB
mysql -u root -p
- Enter the password from Step 1.4.1.
- Run the following command replacing "USERNAME" with a username you have selected (do not use
rootas username) and "PASSWORD" with a secure password:
CREATE USER 'USERNAME'@'localhost' IDENTIFIED BY 'PASSWORD';
GRANT ALL PRIVILEGES ON *.* TO 'Username'@'localhost' WITH GRANT OPTION;
FLUSH PRIVILEGES;
exit;
Step 1.5 - Installing a configuration for the web server
First, make sure your domain or subdomain is linked to your server in its DNS settings.
In the following commands, replace every DOMAIN with your domain or subdomain:
- Generate an SSL certificate with
certbot certonly --apache -d DOMAIN. - Run
nano /etc/apache2/sites-enabled/DOMAIN.conf. - Paste these lines into the file:
<VirtualHost *:443>
    ServerName DOMAIN

    DocumentRoot /var/www/FOLDER

    ErrorLog ${APACHE_LOG_DIR}/DOMAIN-error.log

    Header always set Strict-Transport-Security "max-age=15552000"

    SSLCertificateFile /etc/letsencrypt/live/DOMAIN/fullchain.pem
    SSLCertificateKeyFile /etc/letsencrypt/live/DOMAIN/privkey.pem
</VirtualHost>
- Replace every
DOMAINwith your domain and set a folder path under "DocumentRoot". All files in this folder will be available via your DOMAIN in the web. - Save your changes by pressing CTRL + X, then y and finally by hitting ENTER.
- Now create this folder with
mkdir /var/www/FOLDER. - Restart Apache2 with
service apache2 restart.
Note:
If you are doing this directly on a domain and NOT on a subdomain, or want to make the site available on more sites, I recommend adding a server alias to the configuration as you see below. (If you want to make this site available on any subdomain that looks like abc, you can also add abc.* as the server alias.)
For this change you need to regenerate the SSL certificate with certbot certonly --apache -d DOMAIN,www.DOMAIN,web.DOMAIN,sub.DOMAIN.
<VirtualHost *:443>
    ServerName DOMAIN
+   ServerAlias www.DOMAIN web.DOMAIN

    DocumentRoot /var/www/FOLDER

    ErrorLog ${APACHE_LOG_DIR}/DOMAIN-error.log

    Header always set Strict-Transport-Security "max-age=15552000"

    SSLCertificateFile /etc/letsencrypt/live/DOMAIN/fullchain.pem
    SSLCertificateKeyFile /etc/letsencrypt/live/DOMAIN/privkey.pem
</VirtualHost>
Step 1.6 - Installing phpMyAdmin (optional)
Download and configure phpMyAdmin:
curl -L https://www.phpmyadmin.net/downloads/phpMyAdmin-latest-all-languages.zip -o phpmyadmin.zip
unzip phpmyadmin.zip
rm phpmyadmin.zip
mv phpMyAdmin-*-all-languages pma
mv pma /var/www
nano /var/www/pma/config.inc.php
Add the following lines and change x1rfsRmlidz69R3vKvxpDVl6lbOReX0Emc3sVD0ZkpXh4ek12zMZCWJJi722Se36M0fiRdRDPk05ePcO4W0l8bP8vJMcMhoLVSs to make it unique. This will make the cookies used by phpMyAdmin more secure.
<?php
declare(strict_types=1);
$cfg['blowfish_secret'] = 'x1rfsRmlidz69R3vKvxpDVl6lbOReX0Emc3sVD0ZkpXh4ek12zMZCWJJi722Se36M0fiRdRDPk05ePcO4W0l8bP8vJMcMhoLVSs';
$i = 0;
$i++;
$cfg['Servers'][$i]['auth_type'] = 'cookie';
$cfg['Servers'][$i]['host'] = 'localhost';
$cfg['Servers'][$i]['compress'] = false;
$cfg['Servers'][$i]['AllowNoPassword'] = false;
$cfg['UploadDir'] = '';
$cfg['SaveDir'] = '';
Save your changes by pressing CTRL + X, then y and finally by hitting ENTER.
Now you have two options:
- Create a new configuration for a new domain/subdomain (see Step 1.5) in which you want to use phpMyAdmin (set
DocumentRoot /var/www/FOLDERtoDocumentRoot /var/www/pma). Then you can open phpMyAdmin over this domain/subdomain. You are now finished with the installation of phpMyAdmin. - Or you open an existing configuration of an existing domain/subdomain (from Step 1.5) in which you want to use phpMyAdmin (replace FILE.conf with the name of the configuration file of your domain/subdomain) - see below.
nano /etc/apache2/sites-enabled/FILE.conf
Now add a new line with the following content:
Alias /pma /var/www/pma
You only need to add this one line to the existing file.
It should look like in the example below. The green line must be added (but without the + at the beginning of the line):
<VirtualHost *:443>
    ServerName DOMAIN

+   Alias /pma /var/www/pma
    DocumentRoot /var/www/FOLDER

    ErrorLog ${APACHE_LOG_DIR}/DOMAIN-error.log

    Header always set Strict-Transport-Security "max-age=15552000"

    SSLCertificateFile /etc/letsencrypt/live/DOMAIN/fullchain.pem
    SSLCertificateKeyFile /etc/letsencrypt/live/DOMAIN/privkey.pem
</VirtualHost>
Restart Apache2 by running service apache2 restart.
You can open phpMyAdmin via https://DOMAIN/pma and log in with your data from Step 1.4.2.
Step 1.7 - Creating a database (optional)
Step 1.7.1 - phpMyAdmin
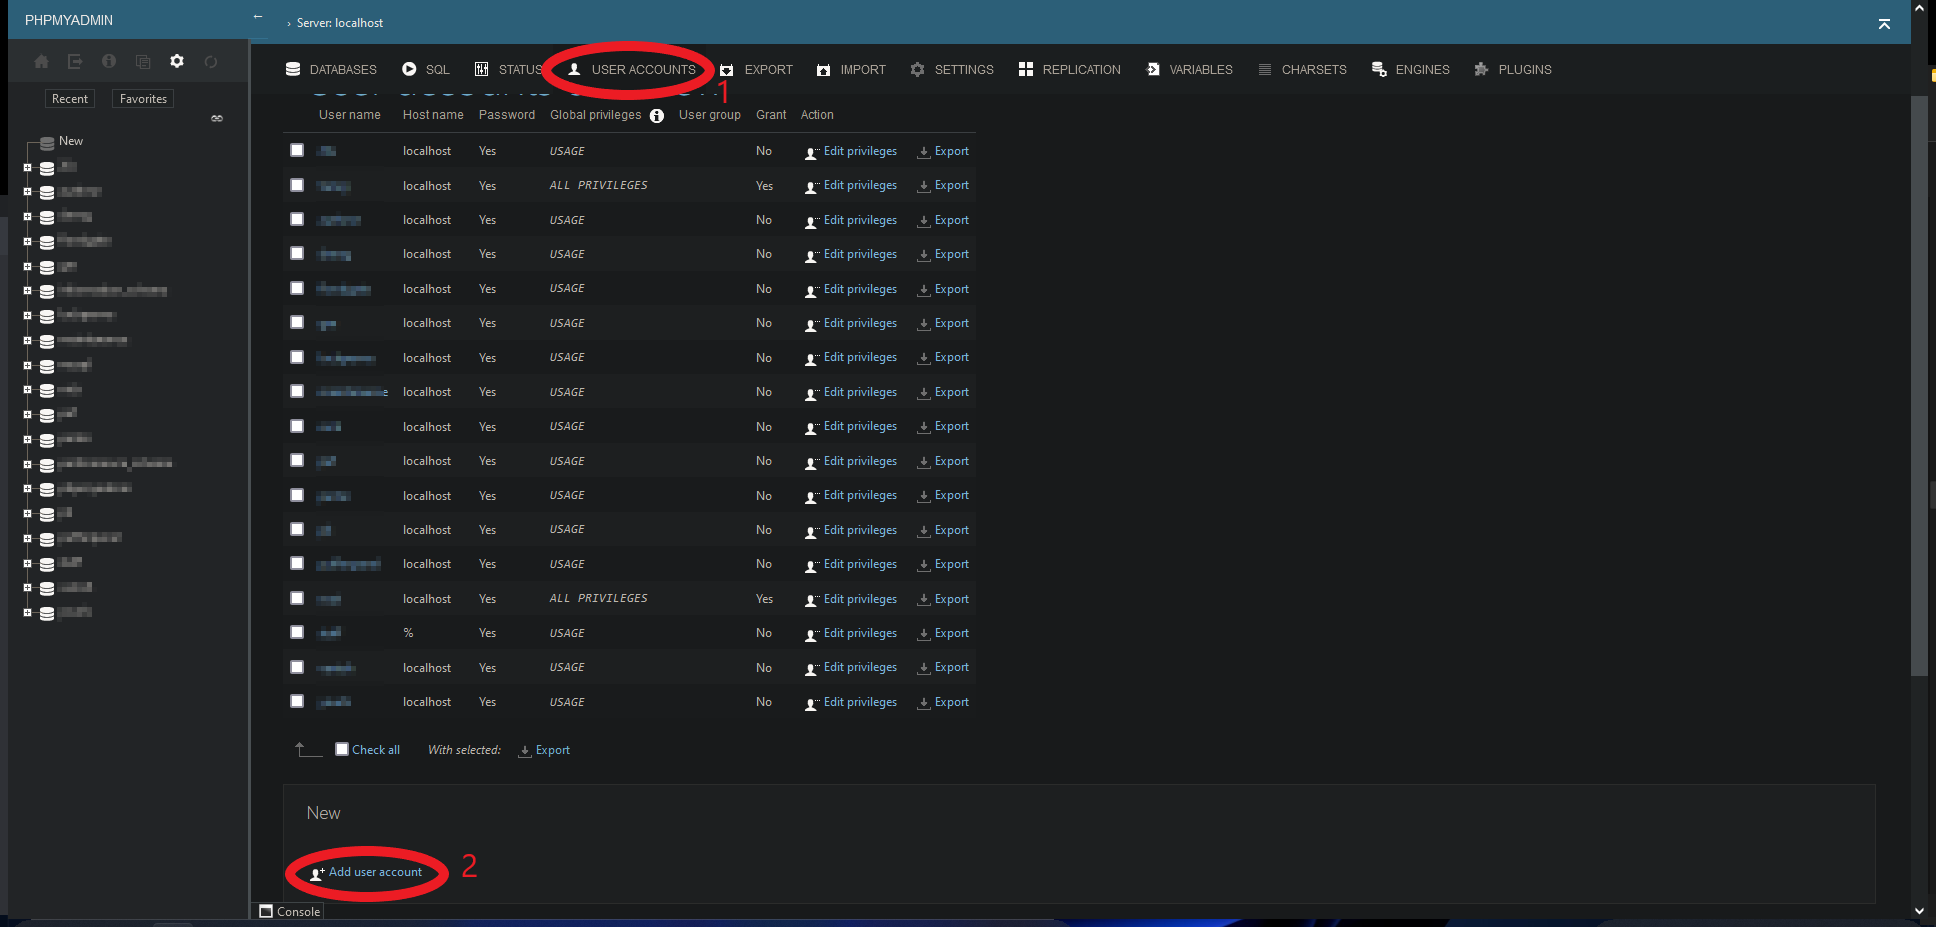
If you have phpMyAdmin from Step 1.6 installed, open phpMyAdmin and enter your username and password from Step 1.4.2.
- Go to "User Accounts" at the top and click "Add user account" under "New" (see screenshots below).
- Enter a username (for example
wordpressif you want to use the database for a WordPress site). - Set the hostname to "localhost" and define a secure password or generate one.
- Select the checkbox "Create database with same name and grant all privileges."
- Click "Go" at the bottom of the page. Your user is now created and you can connect to the database via localhost with the username and password. The name of the database is the same as the username.
Step 1.7.2 - Over SSH
Run the following commands:
mysql -u root -p
- Enter the password from Step 1.4.1
- Run the following command and replace "USERNAME" with a username (for example
wordpressif you want to use the database for a WordPress site) and replace "PASSWORD" with a secure password:
CREATE USER 'USERNAME'@'localhost' IDENTIFIED BY 'PASSWORD';
CREATE DATABASE USERNAME;
GRANT ALL PRIVILEGES ON USERNAME.* TO 'USERNAME'@'localhost';
FLUSH PRIVILEGES;
exit;
Now your user has been created and you can connect to the database via localhost.
Step 2 - Install additional webservices
Information on how to properly install additional webservices can be found in the following tutorials:
- Nextcloud - Create your own private cloud!
- YOURLS - Your own URL shortener!
- Wordpress - Create blogs and websites
- Uptime Kuma - Monitor webservices and more
- Pufferpanel - Gameserver webservice
Conclusion
You have now installed a web server with PHP and a MySQL/MariaDB database.
This tutorial contains content sourced from https://github.com/SanCraftDev/Debian-Setup/blob/main/README.md and https://github.com/louislam/uptime-kuma.
License
Permission is hereby granted, free of charge, to any person obtaining a copy of this software and associated documentation files (the "Software"), to deal in the Software without restriction, including without limitation the rights to use, copy, modify, merge, publish, distribute, sublicence, and/or sell copies of the Software, and to permit persons to whom the Software is furnished to do so, subject to the following conditions:
The above copyright notice and this permission notice shall be included in all copies or substantial portions of the Software.
THE SOFTWARE IS PROVIDED "AS IS", WITHOUT WARRANTY OF ANY KIND, EXPRESS OR IMPLIED, INCLUDING BUT NOT LIMITED TO THE WARRANTIES OF MERCHANTABILITY, FITNESS FOR A PARTICULAR PURPOSE AND NONINFRINGEMENT. IN NO EVENT SHALL THE AUTHORS OR COPYRIGHT HOLDERS BE LIABLE FOR ANY CLAIM, DAMAGES OR OTHER LIABILITY, WHETHER IN AN ACTION OF CONTRACT, TORT OR OTHERWISE, ARISING FROM, OUT OF OR IN CONNECTION WITH THE SOFTWARE OR THE USE OR OTHER DEALINGS IN THE SOFTWARE.
Contributor's Certificate of Origin
By making a contribution to this project, I certify that:
-
The contribution was created in whole or in part by me and I have the right to submit it under the license indicated in the file; or
-
The contribution is based upon previous work that, to the best of my knowledge, is covered under an appropriate license and I have the right under that license to submit that work with modifications, whether created in whole or in part by me, under the same license (unless I am permitted to submit under a different license), as indicated in the file; or
-
The contribution was provided directly to me by some other person who certified (a), (b) or (c) and I have not modified it.
-
I understand and agree that this project and the contribution are public and that a record of the contribution (including all personal information I submit with it, including my sign-off) is maintained indefinitely and may be redistributed consistent with this project or the license(s) involved.