
ROOT-SERVER TUTORIAL
Setup and usage of an MLflow Server


Introduction
In this tutorial you will learn how to set up an MLflow server for experiment tracking. Such a server is crucial for meaningful AI development and data science, as minor parameter changes can have a huge impact on performance. Having a central instance for storing such information is also beneficial with regard to collaboration. Additionally, MLflow also provides a basic visualization of the tracked information so that models can be easily compared.
Unfortunately, MLflow does not provide any authentication feature. So this tutorial also covers setting up http basic authentication with nginx and accessing the MLflow instance from a Python script.
Requirements
A tracking server, unlike training instances, does not require many resources.
Therefore, a simple VPS, e.g. VPS 200 G10s should be enough for the moment.
In the long run, more hard drive space may be required.
The main requirement for this tutorial is a Linux server with a user with sudo rights.
Step 1 - Ordering the VPS
For this tutorial, we are using the VPS 200 G10s, but any VPS or root server should be usable.
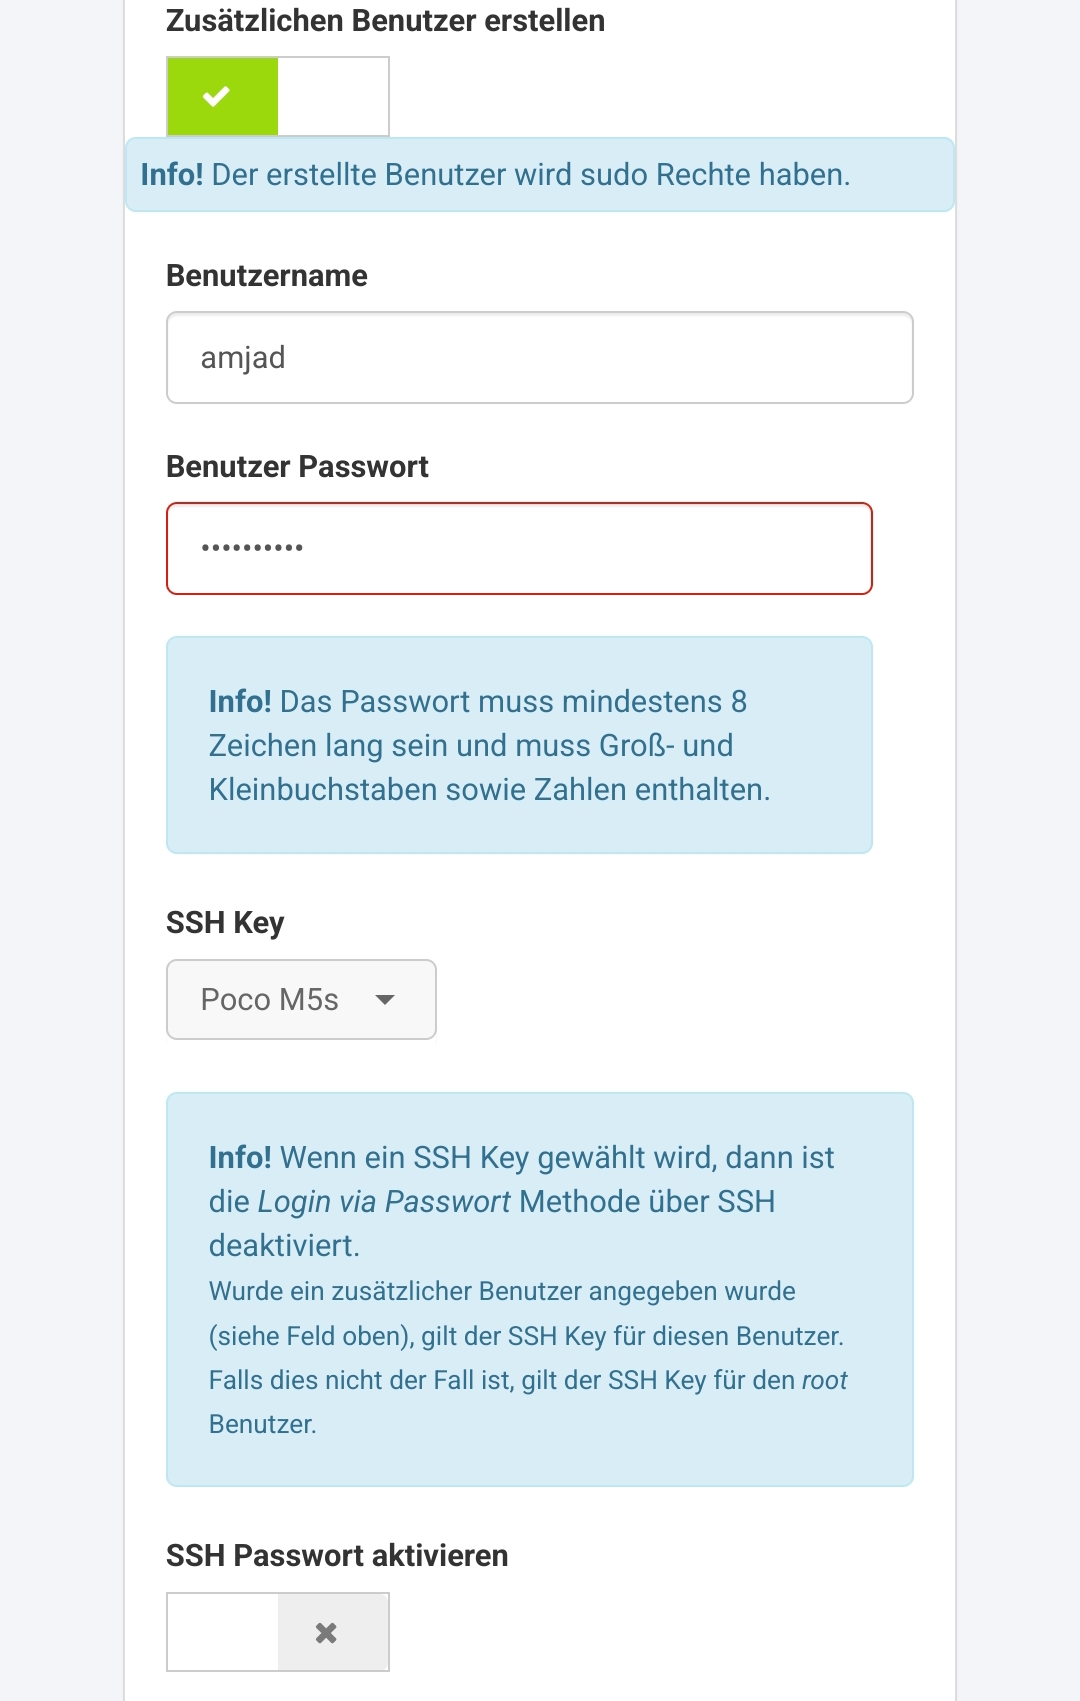
After getting access to the serer, I provisioned it with the Ubuntu 22.04 LTS minimal image provided in the SCP. In addition, I enabled a custom user named amjad and "shh key only" login for this specific user during the setup (see screenshot below).
Step 2 - Install system dependencies
After provisioning, the server should be ready for login with the provided user (amjad in this tutorial).
First of all we should run updates:
$ sudo apt-get update -y && sudo apt-get upgrade -y
After all updates are done, some applications need to be installed:
python3: MLflow is mainly written in Python.pip: Python package managerpython3.10-venv: for creating virtual environmentsgcc: compiler, which will be needed later for some Python packagespostgressql: MLflow provides different backends for storing the information. By default a .yaml file is used, but an SQL database is better in terms of read and write performance as the database grows.- nginx: as reverse proxy to provide authentication
$ sudo apt-get install -y python3 python3-pip python3.10-venv postgresql nginx gcc
Typically, Postgres and nginx services start automatically.
Step 3 - Prepare database
Next we need to set up the database. This is done by the following commands:
$ sudo -u postgres psql
could not change directory to "/home/amjad": Permission denied
psql (14.7 (Ubuntu 14.7-0ubuntu0.22.04.1))
Type "help" for help.

postgres=# create database MLflow;
CREATE DATABASE
postgres=# create user MLflow with encrypted password 'airocks';
CREATE ROLE
postgres=# grant all privileges on database MLflow to MLflow;
GRANT
Here the password is airocks, please use a more secure one when setting up your server.
Step 4 - Install MLflow itself
In this step we will install MLflow itself. We are going to install it in a virtual environment to avoid interference with other applications:
$ python3 -m venv MLflow_venv
$ source MLflow_venv/bin/activate
(MLflow_venv) $ pip install MLflow psycopg2-binary
This will install a whole bunch of dependencies for MLflow.
The psycopg2-binary package is required for the connection to the Postgres database.
To check whether the installation was successful, you can run the following command:
(MLflow_venv) $ MLflow --version MLflow, version 2.2.2
Please bear in mind that you have to activate the virtual environment before running any MLflow command.
Next we take care about the directories for log files and artifacts since they are not stored in the database:
(MLflow_venv) $ mkdir -p ~/MLflow/mlruns # artifact dir
(MLflow_venv) $ mkdir -p ~/MLflow/mllogs # logs dir
To test runability, we will start the MLflow server in a "free-to-all" manner on port 8000:
(MLflow_venv) $ MLflow server --backend-store-uri postgresql://MLflow:airocks@localhost/MLflow --artifacts-destination ~/MLflow/mlruns --serve-artifacts -h 0.0.0.0 -p 8000
2023/03/22 14:23:32 INFO MLflow.store.db.utils: Creating initial MLflow database tables...
2023/03/22 14:23:32 INFO MLflow.store.db.utils: Updating database tables
INFO  [alembic.runtime.migration] Context impl PostgresqlImpl.
INFO  [alembic.runtime.migration] Will assume transactional DDL.
INFO  [alembic.runtime.migration] Running upgrade  -> 451aebb31d03, add metric step
INFO  [alembic.runtime.migration] Running upgrade 451aebb31d03 -> 90e64c465722, migrate user column to tags
INFO  [alembic.runtime.migration] Running upgrade 90e64c465722 -> 181f10493468, allow nulls for metric values
INFO  [alembic.runtime.migration] Running upgrade 181f10493468 -> df50e92ffc5e, Add Experiment Tags Table
INFO  [alembic.runtime.migration] Running upgrade df50e92ffc5e -> 7ac759974ad8, Update run tags with larger limit
INFO  [alembic.runtime.migration] Running upgrade 7ac759974ad8 -> 89d4b8295536, create latest metrics table
INFO  [89d4b8295536_create_latest_metrics_table_py] Migration complete!
INFO  [alembic.runtime.migration] Running upgrade 89d4b8295536 -> 2b4d017a5e9b, add model registry tables to db
INFO  [2b4d017a5e9b_add_model_registry_tables_to_db_py] Adding registered_models and model_versions tables to database.
INFO  [2b4d017a5e9b_add_model_registry_tables_to_db_py] Migration complete!
INFO  [alembic.runtime.migration] Running upgrade 2b4d017a5e9b -> cfd24bdc0731, Update run status constraint with killed
INFO  [alembic.runtime.migration] Running upgrade cfd24bdc0731 -> 0a8213491aaa, drop_duplicate_killed_constraint
INFO  [alembic.runtime.migration] Running upgrade 0a8213491aaa -> 728d730b5ebd, add registered model tags table
INFO  [alembic.runtime.migration] Running upgrade 728d730b5ebd -> 27a6a02d2cf1, add model version tags table
INFO  [alembic.runtime.migration] Running upgrade 27a6a02d2cf1 -> 84291f40a231, add run_link to model_version
INFO  [alembic.runtime.migration] Running upgrade 84291f40a231 -> a8c4a736bde6, allow nulls for run_id
INFO  [alembic.runtime.migration] Running upgrade a8c4a736bde6 -> 39d1c3be5f05, add_is_nan_constraint_for_metrics_tables_if_necessary
INFO  [alembic.runtime.migration] Running upgrade 39d1c3be5f05 -> c48cb773bb87, reset_default_value_for_is_nan_in_metrics_table_for_mysql
INFO  [alembic.runtime.migration] Running upgrade c48cb773bb87 -> bd07f7e963c5, create index on run_uuid
INFO  [alembic.runtime.migration] Running upgrade bd07f7e963c5 -> 0c779009ac13, add deleted_time field to runs table
INFO  [alembic.runtime.migration] Running upgrade 0c779009ac13 -> cc1f77228345, change param value length to 500
INFO  [alembic.runtime.migration] Running upgrade cc1f77228345 -> 97727af70f4d, Add creation_time and last_update_time to experiments table
INFO  [alembic.runtime.migration] Context impl PostgresqlImpl.
INFO  [alembic.runtime.migration] Will assume transactional DDL.
2023/03/22 14:23:32 INFO MLflow.store.db.utils: Creating initial MLflow database tables...
2023/03/22 14:23:32 INFO MLflow.store.db.utils: Updating database tables
INFO  [alembic.runtime.migration] Context impl PostgresqlImpl.
INFO  [alembic.runtime.migration] Will assume transactional DDL.
[2023-03-22 14:23:32 +0100] [23838] [INFO] Starting gunicorn 20.1.0
[2023-03-22 14:23:32 +0100] [23838] [INFO] Listening at: http://0.0.0.0:8000 (23838)
[2023-03-22 14:23:32 +0100] [23838] [INFO] Using worker: sync
[2023-03-22 14:23:32 +0100] [23839] [INFO] Booting worker with pid: 23839
[2023-03-22 14:23:32 +0100] [23840] [INFO] Booting worker with pid: 23840
[2023-03-22 14:23:32 +0100] [23841] [INFO] Booting worker with pid: 23841
[2023-03-22 14:23:32 +0100] [23842] [INFO] Booting worker with pid: 23842
[2023-03-22 14:23:44 +0100] [23838] [INFO] Handling signal: winch
[2023-03-22 14:23:44 +0100] [23838] [INFO] Handling signal: winch
[2023-03-22 14:23:44 +0100] [23838] [INFO] Handling signal: winch
Now you should be able to see the webui in a browser by typing the IP address or the proper domain name in the address line and appending an :8000 for the port.

You will probably see almost nothing, but this will change later when we run a few experiments and track them to this instance.
For now please kill the process with ctrl+c to avoid security issues.
Also, MLflow is currently not started automatically when the server is restarted.
Step 5 - Setup MLflow as service
Now we are going to tell systemd to take care about the MLflow server.
Therefore, an MLflow.service file needs to be created at /etc/systemd/system and filled with the following input:
[Unit]
Description=MLflow Server
After=network.target
[Service]
Restart=on-failure                                      RestartSec=30                                           StandardOutput=file:/home/amjad/MLflow/mllogs/stdout.logStandardError=file:/home/amjad/MLflow/mllogs/stderr.log User=root                                               ExecStart=/bin/bash -c 'PATH=/home/amjad/MLflow_venv/bin:$PATH exec MLflow server --backend-store-uri postgresql://MLflow:airocks@localhost/MLflow --artifacts-destination ~/MLflow/mlruns --serve-artifacts -h 127.0.0.1 -p 8000'

[Install]
WantedBy=multi-user.target
In this file, the virtual environment is "encoded" in the PATH variable. Please note that the host flag (-h flag in the cli) is changed here to 127.0.0.1, so MLflow cannot be accessed directly.
We are going to use nginx to face the outer web and to take care about authentication.
Now the MLflow service needs to be enabled:
$ sudo systemctl daemon-reload
$ sudo systemctl enable MLflow Created symlink /etc/systemd/system/multi-user.target.wants/MLflow.service → /etc/systemd/system/MLflow.service.
$ sudo systemctl start MLflow
Step 6 - Set up nginx with http basic authentication
In this step, we are going to use nginx to pass the requests to MLflow.
In file /etc/nginx/sites-enabled/default you just need to change the line
try_files $uri $uri/ =404;
by
proxy_pass http://localhost:8000;
Next we want to introduce http basic authentication, but first of all we need to install apache2-utils:
$ sudo apt-get install -y apache2-utils
This package is needed to generate a proper password hash.
Now we create a new user called amjad:
$ sudo htpasswd -c /etc/apache2/.htpasswd amjad
New password:
Re-type new password:
Adding password for user amjad
You need to type in your password twice. I used airules, please use a better one for your server.
Next we need to head back to /etc/nginx/sites-enabled/default and add the following lines right after the proxy_pass statement you introduced before:
auth_basic "MLflow Access"; auth_basic_user_file /etc/apache2/.htpasswd;
Now you have to restart nginx:
$ sudo systemctl restart nginx.service
With this you have secured your MLflow instance, at least a little bit. To be really safe, you need to enforce TLS, but that's a topic for another tutorial.
Step 7 - Track your first experiment
Your MLflow instance is ready for use, but how to use it? This is the final step, which shows you how to track your experiments.
First of all, you need to make sure that you've also got python3 and pip installed on your local machine:
$ python3 --version
Python 3.11.2
$ pip --version
pip 23.0.1 from /data/data/com.termux/files/usr/lib/python3.11/site-packages/pip (python 3.11)
Then create a virtual environment locally and install MLflow and scikit-learn:
$ python3 -m venv ai_playground
$ source ai_playground/bin/activate
(ai_playground) ~ $ pip install MLflow scikit-learn
We are going to utilize scikit-learn to train a random forest classifiers of different sizes (i.e. numbers of trees) on the iris dataset (a toy example for classification of flowers) to compare their accuracy with each other.
We create an experiment called RF Tree Numbers, iterate over sizes from 1 to 20 trees, and log the numbers of trees and the accuracy of the random forest in a so called run (a substructure of an MLflow experiment).
Finally, the trained random forest will be saved along with the parameter and accuracy, so you can download the model afterwards.
We are going to use the following script to do our first experiment (it is well commented):
from sklearn.datasets import load_iris
from sklearn.model_selection import train_test_split
from sklearn.ensemble import RandomForestClassifier
import MLflow  MLflow.set_tracking_uri('http://amjad:airules@46.38.237.20') # Do tracking on our fresh remote server

## Download and load data
data = load_iris()

X = data['data']
y = data['target']

## Split data into training and teat set
X_train, X_test, y_train, y_test = train_test_split(X, y, test_size=0.2, random_state=42) # Avoid randomness in split
exp_name = 'RF Tree Numbers'
## Ecaluate random forests with different number of trees
experiment = MLflow.get_experiment_by_name(exp_name)
if experiment is None:
    experiment_id = MLflow.create_experiment(exp_name)
else:
    experiment_id = experiment.experiment_id

for n_est in range(1, 21): # Check forests from 1 to 20 trees     MLflow.start_run(experiment_id=experiment_id)
    rf = RandomForestClassifier(n_est)
    rf.fit(X_train, y_train) # Training
    accuracy = rf.score(X_test, y_test) # Evaluation
    ## Keep track with MLflow logging     MLflow.log_param('n_est', n_est)     MLflow.log_metric('accuracy', accuracy)     MLflow.sklearn.log_model(rf, artifact_path="sklearn-model") # Upload trained model as artifact     MLflow.end_run()
A detailed explanation of how random forests work is out of scope of this tutorial. In short words: a random forest is a bunch of decision trees. Each tree decides on its own which class a sample belongs to. In the end there is a vote and the class voted the most will be chosen as result. More details can be read here.
I saved the script under example.py and executed it by calling python example.py within my local virtual environment.
After the script has finished running, the webui looks a bit different:
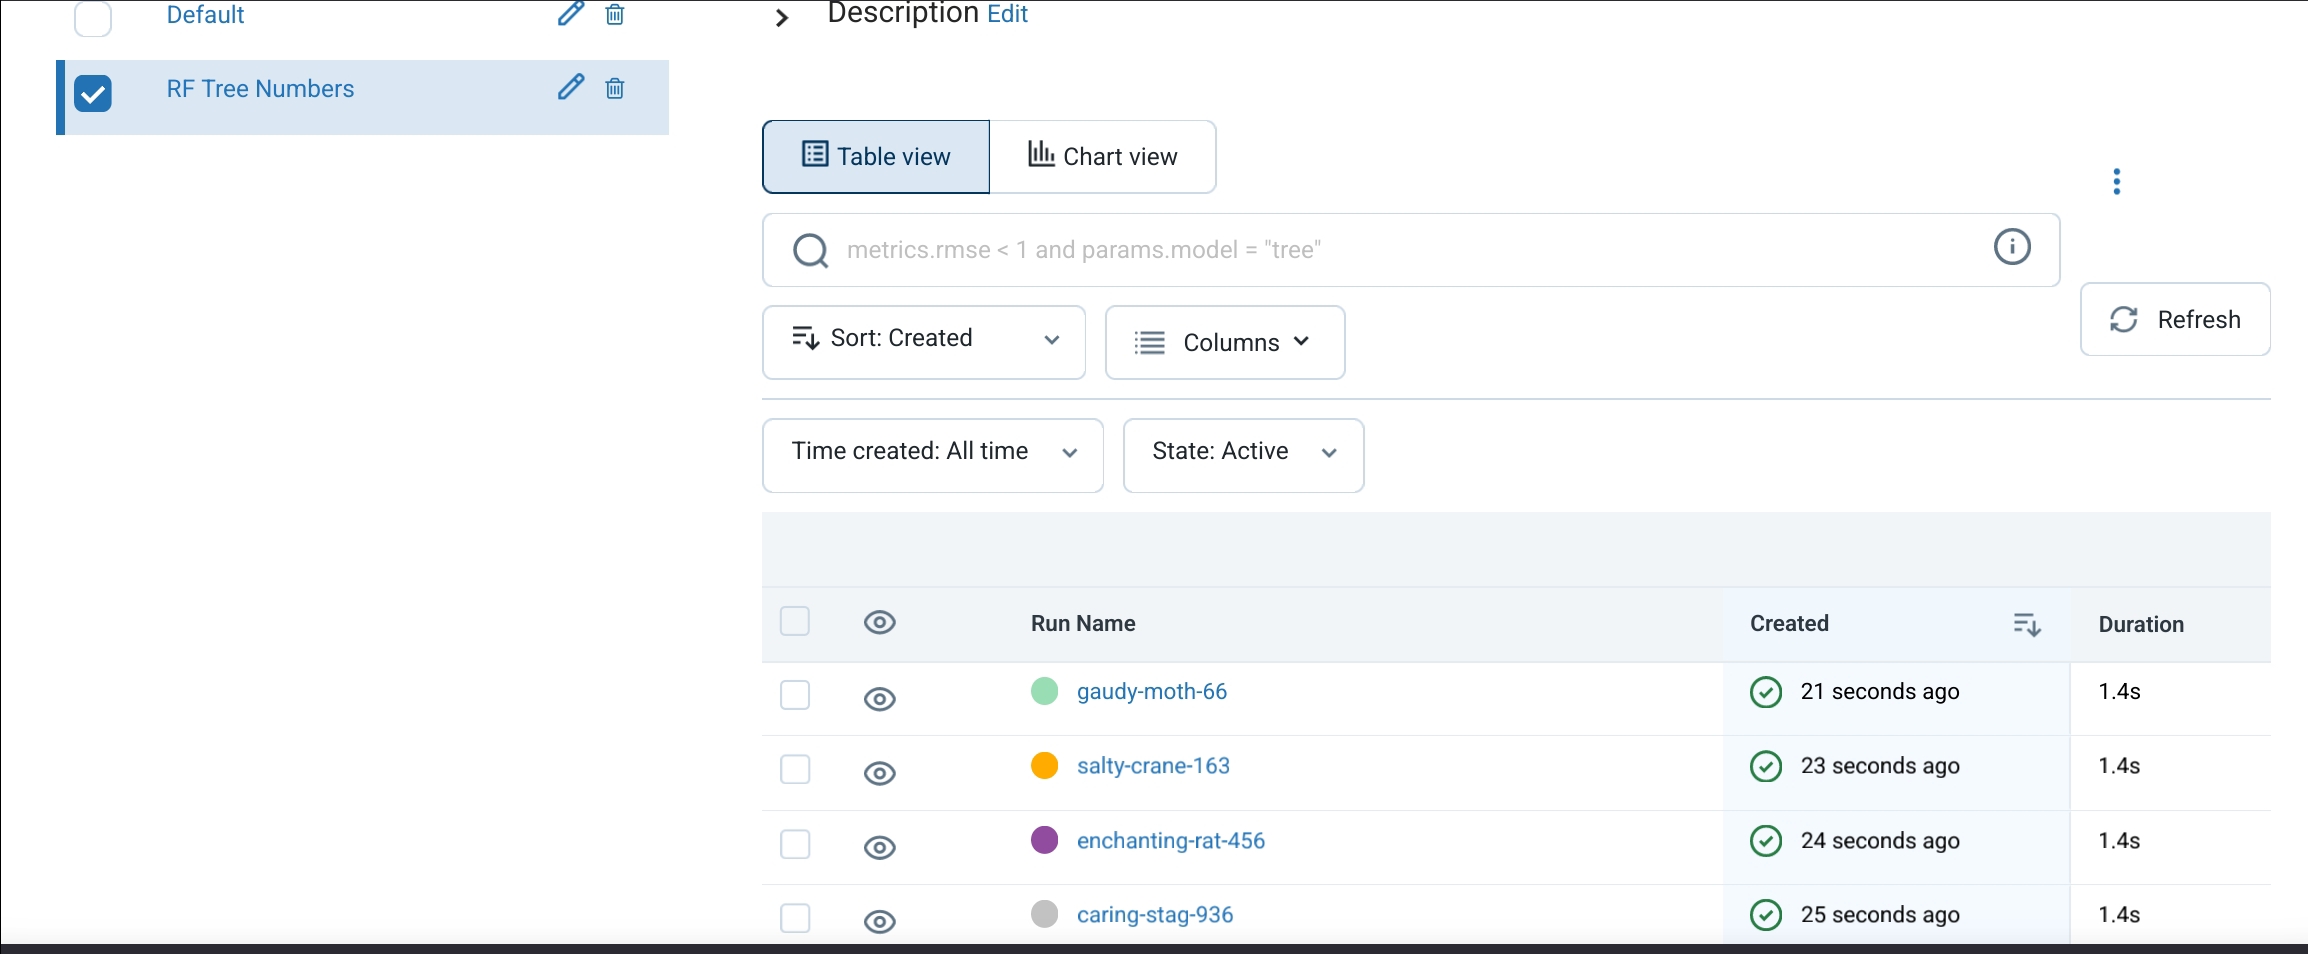
Each run of an experiment is listed in the webui and can be explored by clicking on the experiments. You can check how many trees have been trained (n_est parameter) and how high the accuracy is.
Additionally, you can also download the trained models and do comparisons.
Conclusion
After following the description in this tutorial, you have set up a central MLflow instance to track your AI experiments for sustainable and reproducible data science. Additionally, you have tracked your first machine learning experiments.
Further steps would be to secure the access via TLS and improve scalability in the long run.
Licence
Copyright (c) 2021 netcup
Permission is hereby granted, free of charge, to any person obtaining a copy of this software and associated documentation files (the "Software"), to deal in the Software without restriction, including without limitation the rights to use, copy, modify, merge, publish, distribute, sublicence, and/or sell copies of the Software, and to permit persons to whom the Software is furnished to do so, subject to the following conditions:
The above copyright notice and this permission notice shall be included in all copies or substantial portions of the Software.
THE SOFTWARE IS PROVIDED "AS IS", WITHOUT WARRANTY OF ANY KIND, EXPRESS OR IMPLIED, INCLUDING BUT NOT LIMITED TO THE WARRANTIES OF MERCHANTABILITY, FITNESS FOR A PARTICULAR PURPOSE AND NONINFRINGEMENT. IN NO EVENT SHALL THE AUTHORS OR COPYRIGHT HOLDERS BE LIABLE FOR ANY CLAIM, DAMAGES OR OTHER LIABILITY, WHETHER IN AN ACTION OF CONTRACT, TORT OR OTHERWISE, ARISING FROM, OUT OF OR IN CONNECTION WITH THE SOFTWARE OR THE USE OR OTHER DEALINGS IN THE SOFTWARE.
Contributor's Certificate of Origin
By making a contribution to this project, I certify that:
-
The contribution was created in whole or in part by me and I have the right to submit it under the licence indicated in the file; or
-
The contribution is based upon previous work that, to the best of my knowledge, is covered under an appropriate licence and I have the right under that licence to submit that work with modifications, whether created in whole or in part by me, under the same licence (unless I am permitted to submit under a different licence), as indicated in the file; or
-
The contribution was provided directly to me by some other person who certified (a), (b) or (c) and I have not modified it.
-
I understand and agree that this project and the contribution are public and that a record of the contribution (including all personal information I submit with it, including my sign-off) is maintained indefinitely and may be redistributed consistent with this project or the licence(s) involved.