
ROOT-SERVER TUTORIAL
Setup and Usage of a Simple SSH Proxy


Introduction
This tutorial describes how to set up and use a simple SSH proxy that allows you to utilize an SSH connection to your own servers in environments with a blocked port 22.
This is useful, for example, when traveling or if internet access is limited in hotels or vacation homes.
The reading time of this tutorial is about five minutes; implementation will take approximately 45 minutes.
The most important requirement for implementation is a basic understanding of the Unix command line and the use of SSH services and proxy servers. All examples were tested on a current Debian/Ubuntu (October 2021) and can be easily adapted to other distributions.
Use of the proxy is described from a Unix user's point of view and it works similarly under macOS. For its use under Windows, further adjustments are necessary, which are not part of this tutorial.
The tutorial uses the example hostname v11111111.quicksrv.de. This hostname needs to be replaced by the name of your own server when you perform the workflow described in this tutorial.
Requirements
Since the presented technology is optimized for short deployment times ranging from days to a few weeks, the server should meet the following requirements:
- It should be economical,
- have sufficient CPU power, and
- it should have a German IP address.
The hard disk capacity, on the other hand, is not relevant.
The simplest VPS from netcup meets these requirements thanks to hourly billing.
Step 1 - Order the VPS
At the time of the creation of this tutorial (October 2021), the recommended product to be used as SSH proxy is a VPS 200 G8. Just choose the newest generation VPS 200 from netcup's range of VPS.
Existing customers can add the product easily and quickly.
Step 2 - Basic configuration of the server
After provisioning of the server and the first login with the username root and the password sent by email, the first step is to update the basic configuration of the server.
- Change the root password by means of
passwd. - Import the current security updates with
apt-get update && apt-get upgrade -y. - It is recommended to set up an SSH key at this point and to disallow password login for the root user as described in this tutorial. These procedures are not part of this tutorial and as the latter functionality requires root capability, the setup of an unprivileged user is omitted at this point.
Step 3 - Configuration of SSH daemon
SSH daemon usually listens on port 22. To make it accessible even from restricted networks, it is configured to listen also on ports 443 (HTTPS) and 80 (HTTP). These ports are usually less restricted or not restricted at all, so there is a good chance that they can be used to gain free access to the proxy and thus to the internet.
- Open the file
/etc/ssh/sshd_configin an editor likeviornano. - Search for the line
port 22. It probably starts with a#to indicate that this is the basic configuration. - Change the file to:
port 22 port 80 port 443 - Save and exit the editor.
- Restart SSH daemon with
systemctl restart ssh. The current session should remain active. - Use
ssh -p 443 root@v11111111.quicksrv.deto test if the configuration was set up successfully. Please replacev11111111.quicksrv.dewith your own hostname.
SSH daemon is now successfully configured and can be reached via ports 22, 80 and 443.
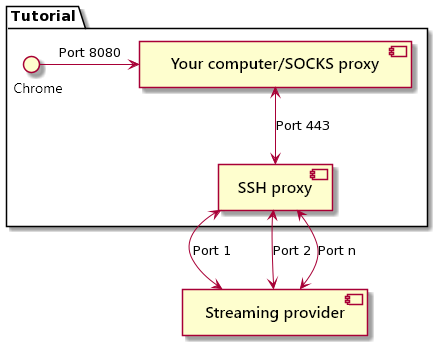
Step 4 - Use as SOCKS server
To use Chrome or another browser in such a way that it handles all traffic through the SSH proxy, you use it as a SOCKS proxy. This way, you can show streaming services, for example, that you are actually located in Germany if the geolocation of your own IP doesn't work properly.
Technically, in this case, your own computer is the SOCKS proxy that uses SSH proxy for forwarding. Therefore, localhost is specified as the (SOCKS) proxy server (see figure below).
Start an SSH session on your own computer with the following command:
ssh -p 443 -D8080 -N root@v11111111.quicksrv.de
Replace the example v11111111.quicksrv.de with the correct server name.
Then start Chrome in a second window with the following command:
google-chrome --proxy-server="socks5://localhost:8080" --host-resolver-rules="MAP * ~NOTFOUND , EXCLUDE localhost"
This results in Chrome using the SOCKS proxy as nameserver for name resolution, which protects your privacy.
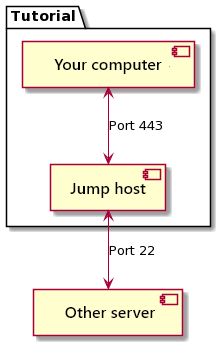
Step 5 - Use as jump server
To access other servers whose SSH daemon is bound only to port 22 (or another), use the command:
ssh -J root@v11111111.quicksrv.de:443 root@myserver.com
Replace our example v11111111.quicksrv.de with the correct proxy server name. Instead of myserver.com you must specify the server to which you want to connect through the proxy.
Conclusion
SSH proxy can now be used. It is recommended to perform tests before productive use.
License
Permission is hereby granted, free of charge, to any person obtaining a copy of this software and associated documentation files (the "Software"), to deal in the Software without restriction, including without limitation the rights to use, copy, modify, merge, publish, distribute, sublicence, and/or sell copies of the Software, and to permit persons to whom the Software is furnished to do so, subject to the following conditions:
The above copyright notice and this permission notice shall be included in all copies or substantial portions of the Software.
THE SOFTWARE IS PROVIDED "AS IS", WITHOUT WARRANTY OF ANY KIND, EXPRESS OR IMPLIED, INCLUDING BUT NOT LIMITED TO THE WARRANTIES OF MERCHANTABILITY, FITNESS FOR A PARTICULAR PURPOSE AND NONINFRINGEMENT. IN NO EVENT SHALL THE AUTHORS OR COPYRIGHT HOLDERS BE LIABLE FOR ANY CLAIM, DAMAGES OR OTHER LIABILITY, WHETHER IN AN ACTION OF CONTRACT, TORT OR OTHERWISE, ARISING FROM, OUT OF OR IN CONNECTION WITH THE SOFTWARE OR THE USE OR OTHER DEALINGS IN THE SOFTWARE.
Contributor's Certificate of Origin
By making a contribution to this project, I certify that:
-
The contribution was created in whole or in part by me and I have the right to submit it under the license indicated in the file; or
-
The contribution is based upon previous work that, to the best of my knowledge, is covered under an appropriate license and I have the right under that license to submit that work with modifications, whether created in whole or in part by me, under the same license (unless I am permitted to submit under a different license), as indicated in the file; or
-
The contribution was provided directly to me by some other person who certified (a), (b) or (c) and I have not modified it.
-
I understand and agree that this project and the contribution are public and that a record of the contribution (including all personal information I submit with it, including my sign-off) is maintained indefinitely and may be redistributed consistent with this project or the license(s) involved.